
Growing Vegetables & Flowers
Reading Time: 18 - 24 minutes (5370 words)
February 12, 2024
—
Table of Contents
Introduction to Growing from Seed

Starting seeds for your garden is not just a gardening activity; it's an experience that connects unlikely gardeners to the essence of life. This process, deeply rewarding and educational, opens up a world of diversity in the garden that often surpasses what's found in local nurseries or garden centres. By choosing to start your plants from seeds, you can select from a wider array of vegetables, flowers, and herbs, including rare and heirloom varieties that are not typically available as ready-to-plant seedlings. This variety allows for a personalized and unique garden that reflects the your tastes and preferences.
Moreover, starting from seed is a cost-effective approach to gardening. Seed packets are relatively inexpensive, and each packet contains enough seeds to grow many plants, offering a higher yield compared to purchasing individual seedlings at a nursery. This cost efficiency makes gardening more accessible and allows for larger gardens without a significant financial investment.
The process of growing from seed involves several key steps, each crucial to the success of the plants. It begins with the selection of seeds, where unlikely gardeners choose varieties suited to their climate and garden space. Following seed selection, preparing the right soil mix becomes essential, as it supports the early growth stages of the seedlings. Sowing seeds, either directly into the garden or starting them indoors, requires understanding the specific needs of each plant species, including depth of planting and spacing.
After sowing, the focus shifts to caring for the seedlings, ensuring they receive adequate light, water, and nutrients to thrive. This stage is critical, as young plants are vulnerable and need constant attention to become strong and healthy. Finally, the process culminates in transplanting the seedlings into the garden, a step that introduces them to their final growing environment. This transition requires careful timing and handling to minimize stress on the plants, ensuring they continue to grow and eventually produce flowers or vegetables.
Keep reading to demystify the process for creating a thriving garden from the ground up. By engaging in this seed staring process, unlikely gardeners will gain a deeper appreciation for the complexity and beauty of plant life, fostering a stronger connection with nature that is both fulfilling and enriching.
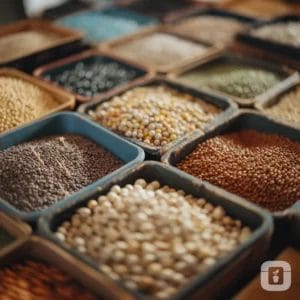
Selecting Seeds for Your Garden
Selecting the right seeds is a crucial first step in the journey of gardening. It sets the stage for the months ahead, influencing not just the success of your garden, but also its uniqueness and the diversity of plants you can grow. High-quality seeds are the cornerstone of a healthy garden, and understanding how to choose these seeds is essential for both novice and experienced gardeners.
Navigating Seed Catalogs and Online Resources
The vast array of seed catalogs and online resources available today can be both exciting and overwhelming. These resources offer an extensive selection of seeds, including vegetables, flowers, herbs, and fruits. When selecting seeds, look for reputable suppliers who provide detailed information about each variety, including its growth habits, care needs, and suitability for specific climates or conditions. Reviews and recommendations from other gardeners can also guide your choices, ensuring you select seeds that have a proven track record of success in environments similar to yours.
Heirloom vs. Hybrid Seeds
One of the key decisions unlikely gardeners face is choosing between heirloom and hybrid seed varieties. Heirloom seeds are passed down through generations and are valued for their genetic purity, distinctive flavours, and traditional characteristics. They often produce plants that are more adaptable to local conditions and can be more resilient to certain pests and diseases. Heirloom varieties also allow gardeners to save seeds from year to year, preserving biodiversity.
Hybrid seeds, on the other hand, are the result of cross-breeding between two different parent plants, aiming to produce offspring that contain the best traits of both. Hybrids often offer improved disease resistance, higher yields, and uniformity in fruit size and shape. However, seeds saved from hybrid plants may not reliably produce plants true to the parent variety, which means new seeds must be purchased each season.
Adaptability to Local Environment and Space

Selecting seeds that are well-suited to your local climate and garden conditions is crucial. Consider factors such as your growing zone, the length of your growing season, and the typical weather conditions in your area. Some plants thrive in cool temperatures, while others require a long, warm growing season to produce. Additionally, the amount of space available in your garden will influence your seed selection. Some plants, like sprawling squash vines, require a lot of room, whereas others, such as lettuce or radishes, can be grown in smaller spaces or containers.
Final Thoughts on Seed Selection
The process of selecting seeds is both an art and a science, requiring a blend of research, personal preferences, and sometimes, a bit of experimentation. By choosing high-quality seeds from reputable sources and considering the specific needs of your garden and local environment, you can set the foundation for a thriving, productive garden. Remember, each seed holds the promise of growth and, ultimately, the joy of harvesting your own fresh flowers and vegetables. The act of selecting seeds is the first step in a journey that connects you to the rhythms of nature and the rewards of gardening.
Soil Selection and Preparation for Seeds
The medium in which seeds are sown plays a pivotal role in their journey from germination to seedling. A good seed starting mix provides the foundation for strong, healthy plant growth. Understanding the characteristics of an ideal soil mix and how to prepare or choose one is essential for gardening success.
Characteristics of a Good Seed Starting Mix

A superior seed starting mix is defined by several key characteristics. Most notably, it should be lightweight and fine-textured, facilitating easy root growth and ensuring that delicate new roots can penetrate the substrate without resistance. The grow mix needs to have excellent drainage capabilities to prevent water from pooling, which can lead to seed rot or fungal diseases like damping-off. At the same time, it should retain enough moisture to keep the seeds hydrated without being waterlogged. Aeration is another critical factor; the soil must allow air to reach the roots, essential for healthy growth.
For more background on these grow mix ingredients take a look at this article on indoor grow media.
Nutrient content in the seed starting mix is a delicate balance. While seeds contain enough energy to germinate and begin growing, seedlings will soon require additional nutrients from their growing medium. However, too high a nutrient concentration can harm delicate young plants. A mix with a gentle, balanced supply of essential nutrients promotes strong early growth.
Adjusting Soil pH and Nutrients

Soil pH can significantly affect seed germination and seedling development. Most plants prefer a slightly acidic to neutral pH (5.8 to 6.9), which allows them to absorb nutrients effectively. Testing your soil mix's pH and adjusting it with lime to raise the pH or sulphur to lower it can create an optimal growing environment.
Incorporating the right balance of nutrients involves adding components like compost or a balanced, slow-release fertilizer to the mix. For seedlings, it's crucial to ensure the nutrient mix is not too concentrated. Using components such as vermi-compost, or diluted liquid fertilizers can provide a mild, natural source of nutrients that won't overwhelm young plants.
Ready-Made Solutions
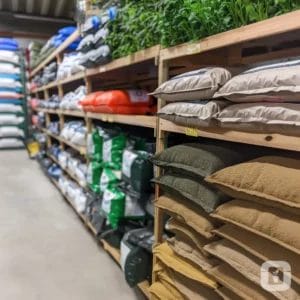
For those who prefer not to mix their own starting medium, several high-quality commercial seed starting mixes are available. These mixes are formulated to provide an ideal balance of drainage, aeration, and nutrients suited for seed germination and young seedlings. When selecting a commercial mix, look for one that specifies it's designed for seed starting, as this ensures it has the properties mentioned above.
Some reputable seed starting mix brands include:
- FoxFarm Light Warrior Seed Starter Soil: Known for its light texture and nutrient mix designed to enhance root growth.
- Espoma Organic Seed Starter: A premium organic mix that provides optimum aeration and moisture retention.
- Jiffy Natural & Organic Seed Starting Mix: Offers a fine, uniform texture that's ideal for seed germination, and it's certified organic.
Soil Starting Summary

Preparing your seeds for success starts with selecting or preparing the right soil mix. Whether you choose to create your own mix or opt for a commercial product, ensuring your seeds have a lightweight, nutrient-rich medium is key. Proper soil preparation sets the stage for healthy seed germination and robust seedling growth, ultimately leading to a successful and productive garden. Paying attention to soil pH and nutrient balance further optimizes the environment for young plants, encouraging strong, early development and paving the way for a bountiful gardening season.
Methods of Seed Starting

Seed starting can be approached from various angles, each with its own set of techniques and considerations. Whether you choose to start your seeds indoors to get a head start on the growing season or sow them directly into the garden soil, understanding the best practices for each method is key to germination success.
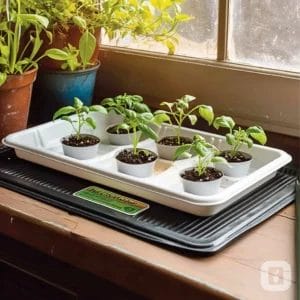
Indoor Seed Starting
Starting seeds indoors allows gardeners to control the growing environment, providing seeds with optimal conditions for germination and early growth. This method is particularly beneficial for regions with shorter growing seasons, as it enables plants to mature earlier.
- Trays and Pots: Seed trays and starter pots are the most common containers used for starting seeds indoors. They can be filled with a seed starting mix, which should be moistened before sowing the seeds. Transparent covers or plastic wrap can be used to maintain humidity until germination occurs.
- Soil Blocks: An alternative to traditional pots and trays, soil blocks are compressed blocks of soil mix that hold their shape. They eliminate the need for plastic containers and can reduce transplant shock, as the entire block is planted directly into the garden.
Creating the ideal environment involves managing temperature and humidity levels closely. Most seeds require a warm environment to germinate, typically between 65-75°F (18-24°C). Heat mats can be used to maintain consistent soil temperatures. After seeds have germinated, adequate light is crucial. A south-facing window or decent quality grow lights can provide the necessary light intensity for healthy seedlings.
Outdoor Seed Starting (Direct Sowing)
Direct sowing involves planting seeds directly into their final growing location in the garden. This method is well-suited for plants that do not transplant well or for gardeners looking to simplify the growing process.
- Preparation: The garden bed should be prepared with loose, fertile soil, ensuring good contact between the seeds and soil. Rows or spots are marked according to the planting depth and spacing requirements of the seeds being sown.
- Watering: Gentle watering is essential to avoid displacing small seeds. A fine mist or a watering can with a rose attachment is ideal for keeping the soil moist without causing erosion.
Germination Techniques
Certain seeds require pre-treatment to break dormancy and encourage germination. These techniques mimic natural processes that seeds would undergo in the wild.

- Stratification: Some seeds, particularly those of perennials and cold-climate plants, need a period of cold treatment to simulate winter conditions. This is achieved by mixing the seeds with moist sand or vermiculite and storing them in the refrigerator for a specified period.
- Scarification: Seeds with hard coats may require scarification, which involves gently scratching or nicking the seed coat to allow water to penetrate. This can be done with sandpaper, a file, or a small knife.
- Soaking: Soaking seeds in water for 12 to 24 hours before planting can significantly speed up germination. This method is especially effective for seeds with thicker coats.
Click the following link for a great read about Stratification and Scarification.
Maintaining the Ideal Germination Environment

For both indoor and outdoor seed starting, maintaining the right environmental conditions is crucial. For indoor setups, monitoring temperature and humidity levels will ensure seeds have the best start. Outdoors, choosing the right time to sow—after the risk of frost has passed for warm-season crops, or while the soil is still cool for cool-season crops—will contribute to successful germination.
By understanding and applying these various methods of seed starting and germination techniques, unlikely gardeners can optimize their planting strategies to suit different plant needs, ultimately leading to a more diverse and productive garden.
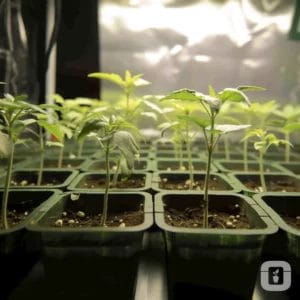
Lighting and Equipment Considerations

For seeds started indoors, providing the right amount and type of lighting is crucial for the development of strong, healthy seedlings. Without adequate light, seedlings can become leggy and weak, compromising their health and productivity once transplanted outdoors. Understanding the lighting needs of plants and the equipment necessary to meet those needs is essential for any indoor gardening setup. I know many of the articles on Unlikely Gardener discuss lighting, but it is one the most important factors that many people underestimate the importance and measurement of.
Importance of Adequate Lighting
Plants rely on light not just for growth but for photosynthesis, the process by which they convert light into chemical energy. Seedlings require a lot of light to grow strong and sturdy. Inadequate lighting leads to seedlings stretching towards the light source, resulting in elongated, fragile stems, which is called etiolation. Ensuring that seedlings receive enough light from the moment they germinate is vital for their overall health and success.
Natural Sunlight vs. Artificial Lighting

- Natural Sunlight: The most accessible light source is natural sunlight, which provides a full spectrum of light wavelengths. Placing seedlings near a south-facing window can sometimes offer sufficient light. However, during the winter months or in regions with less intense sunlight, relying solely on natural light may not meet all the needs of growing seedlings.
- Artificial Lighting: For consistent and optimal growth, artificial lighting is often necessary. Fluorescent lights, including T5 and T8 bulbs with adequate light temperature, have been the standard for years due to their efficiency and the quality of light they produce. However, LED (Light Emitting Diode) grow lights have become increasingly popular, and are now the defacto standard because they are more energy-efficient, emit less heat, and can provide a full spectrum of light tailored to plant growth needs. Both options should be positioned at a distance above the seedlings that allows for the correct light intensity, raising the lights as the plants grow so an optimal amount of light is available for the plants' needs.
Important Equipment Considerations for Indoor Seed Starting
- Heat Mats: Many seeds have specific temperature requirements for optimal germination. Heat mats gently warm the soil, encouraging faster and more consistent germination, especially for warmth-loving plants. These mats are particularly useful in cooler environments or during early spring when indoor temperatures may be lower than ideal for seed starting.
- Humidity Domes: Placing a humidity dome or clear plastic cover over seed starting trays helps maintain higher humidity levels, mimicking the moist environment seeds need for germination. These covers should be removed once the majority of seeds have sprouted to prevent issues with mold and to ensure seedlings have adequate air circulation.
- Timers for Lights: Using timers for grow lights can help provide a consistent amount of light each day. Seedlings typically thrive with 14-16 hours of light per day. A timer ensures that plants receive a regular "day" and "night" cycle, which can be crucial for their development.
- Adjustable Shelving: Adjustable shelving units allow gardeners to raise or lower lights as plants grow, ensuring that lights remain at the optimal distance (often as low as 2-3 inches above the plants) without causing heat damage or etiolation (stretching).
Investing in the right lighting setup and supporting equipment is key to growing robust, healthy seedlings indoors. By understanding the differences between light quality and quantity and any additional equipment needed to create an ideal growing environment, unlikely gardeners can significantly improve their success rate with indoor seed starting, leading to stronger plants ready for transplanting to the garden.
Planning Your Garden Planting

A well-planned garden maximizes productivity, minimizes pest and disease issues, and ensures the best possible conditions for plant growth. By considering several key factors such as sunlight exposure, plant spacing, and the timing of seed starting and transplanting, unlikely gardeners can create a harmonious and efficient garden layout. This planning stage is crucial, especially for those starting from seed, as it sets the foundation for the gardening season ahead.
Designing Your Garden Layout
- Sunlight Exposure: Assess the sunlight available in your garden space. Most vegetables and flowers require at least 6 to 8 hours of direct sunlight per day. Observe your garden area throughout the day to identify which parts receive full sun, partial shade, or full shade, and plan your plant placements accordingly.
- Plant Spacing: Proper spacing is essential for healthy plant growth. Crowded plants compete for light, water, and nutrients, leading to weaker growth and increased susceptibility to diseases. Refer to seed packets or gardening guides for spacing recommendations and design your garden layout to accommodate the mature size of each plant.
- Companion Planting: This questionable practice involves grouping plants that benefit each other by repelling pests, attracting beneficial insects, or enhancing growth. For example, planting marigolds near tomatoes can help deter root knot nematodes in the soil, while nasturtiums can act as a trap plant for aphids when planted nearby. The bulk of the content dedicated to companion planting that you'll find online is not well supported by scientific research, but a few key findings do deliver legitimate benefits. Watch for an upcoming article on companion planning coming soon!
Timing of Seed Starting and Transplanting

- Seed Starting: Determine the best time to start seeds indoors by working backward from your area's last expected frost date. Most seeds should be started 4 to 8 weeks before this date, but this can vary depending on the plant. Use a gardening calendar or online tool tailored to your local climate to schedule seed starting and transplanting dates.
- Transplanting: Transplant seedlings outdoors after the risk of frost has passed and the soil, as well as night time air temperature, has warmed to a point that your specific plant's needs are addressed. Some plants, such as peas and spinach, prefer cooler soil and can be transplanted earlier, while others, like tomatoes and peppers, need warm soil to thrive, and not become stunted.
Hardening Off Seedlings

Before transplanting seedlings outdoors, most must be acclimated to their new environment through a process called hardening off. This involves gradually exposing indoor-grown seedlings to outdoor conditions over a period of 7 to 10 days. Start by placing seedlings outside in a sheltered, partially shaded area for a few hours each day, gradually increasing their exposure to sunlight and outdoor temperatures. This process reduces transplant shock, allowing seedlings to adjust to the wind, sun, and temperature fluctuations they will face in the garden. I'll write a specific article on hardening plants off soon to dovetail with this seed starting artice.
Planning your garden planting is not just about aesthetics; it's a strategic approach to creating a productive and healthy garden. By carefully considering the layout, timing, and preparation of your plants, you can ensure a successful transition from seed starting indoors to thriving plants in the garden. This foundation of planning and preparation paves the way for a rewarding gardening season filled with lush growth and bountiful yields.
Direct Sowing

Direct sowing is an invaluable technique in the unlikely gardener's toolkit, offering a straightforward approach to planting that can lead to strong, healthy plants with minimal stress. This method involves planting seeds directly where they are to grow in the garden, bypassing the need for indoor seed starting or transplanting. Direct sowing is especially suitable for plants that prefer not to be moved or that have a short growing season.
Advantages of Direct Sowing
- Reduced Transplant Shock: Plants grown from direct-sown seeds typically experience no transplant shock since they are not moved from one environment to another. This allows for uninterrupted growth and often results in stronger, more resilient plants.
- Simplified Gardening Process: Direct sowing eliminates the need for indoor seed starting equipment and the labor involved in transplanting. It's a time and resource-efficient method, particularly beneficial for large or in-ground gardens.
- Optimal Root Development: Seeds sown directly into the garden develop their root systems in their permanent location without the constraints of containers, leading to healthier root growth and stronger plants.
Techniques for Successful Direct Sowing
- Soil Preparation: Begin with well-structured soil that's free of large clumps and debris. Incorporate compost or a balanced fertilizer (please have your soil tested if you can first) to ensure nutrients are available for seedling development. The soil should be moist but not waterlogged.
- Proper Spacing: Consult seed packets for spacing guidelines. Proper spacing is crucial to prevent overcrowding, which can lead to competition for light, nutrients, and water. Use a ruler or a spacing tool to achieve uniform distribution, and thin seedlings as needed once they've germinated.
- Timing: The timing of direct sowing is dependent on the plant species and local climate conditions. Cool-season crops like lettuce, peas, and spinach can be sown early in the spring, often before the last frost date. Warm-season crops, such as beans, corn, and squash, should be sown after the danger of frost has passed and the soil has warmed. Using a soil thermometer can help determine when conditions are right.
Understanding Climatic and Soil Conditions
- Climatic Conditions: Pay attention to local weather patterns and seasonal temperature changes. Early or late frosts can impact germination and seedling survival, so it's important to know the best planting windows for your area.
- Soil Conditions: Different plants have varying soil preferences. While most vegetables thrive in well-drained, fertile soil with a neutral to slightly acidic pH, some flowers and herbs may have specific requirements beyond these typical pH ranges. Ensuring your soil meets these conditions before sowing will increase the chances of successful germination and growth.
Direct sowing is an effective and efficient way to grow many types of plants. By understanding and applying the right techniques for soil preparation, spacing, and timing, unlikely gardeners can take full advantage of the benefits this method offers. Whether you're planting a large vegetable garden or a small flower bed, direct sowing can simplify the gardening process while producing robust, healthy plants ready to thrive in their outdoor environment.
Care and Maintenance of Seedlings
Once seeds have germinated, the tender seedlings need meticulous care to ensure their growth into vigorous, healthy plants. Proper care at this stage sets the foundation for their future development, affecting everything from root strength to disease resistance. What follows is the critical aspects of seedling care, emphasizing watering, monitoring growth, and the practice of thinning.
Watering Practices
- Consistency and Method: Seedlings require consistent moisture to thrive, but overwatering can be detrimental, leading to fungal diseases such as damping off. Watering should be done in a way that keeps the soil evenly moist but not waterlogged. Using a watering can with a fine rose or a misting system can help distribute water gently and evenly, reducing the risk of soil erosion or seed displacement.
- Frequency: The frequency of watering will depend on the growing medium's porosity, container size, and overall environmental conditions. Seedlings in smaller containers or in direct sunlight may need daily watering, while those in cooler, more shaded conditions may require less. Always check the top inch or so of soil for dryness before watering.
Monitoring Growth and Adjusting Conditions
- Light: Ensure seedlings receive adequate light for robust growth. If using artificial lights, adjust the height as the seedlings grow to maintain an optimal distance for light intensity to prevent legginess.
- Temperature: After germination, most seedlings grow best at slightly cooler temperatures than required for germination. A range of 65-70°F (18-21°C) during the day and slightly cooler at night is ideal for most species.
- Ventilation: Good air circulation around seedlings is essential for preventing fungal diseases and promoting strong stem growth. If growing indoors, consider using a fan on a low setting to simulate a gentle breeze. This not only helps with excess humidity and moisture, but also builds strength within the plants' stems, branches, and leaves.
Thinning Seedlings
- Importance of Thinning: Thinning is the process of removing excess seedlings to prevent overcrowding. Overcrowded seedlings compete for light, water, and nutrients, leading to weaker plants. Thinning ensures that the remaining seedlings have enough space to develop robust root systems and foliage.
- How to Thin: Wait until seedlings have developed their first true leaves (the second set of leaves) before thinning. Use scissors or small clippers to cut the excess seedlings at the soil level, rather than pulling them out, which can disturb the roots of the remaining plants. Select the strongest, healthiest-looking seedlings to keep.
Caring for seedlings is a delicate balance of providing enough water, light, and nutrients while protecting them from diseases and overcrowding. By closely monitoring and adjusting the growing conditions and practicing proper thinning techniques, unlikely gardeners can nurture their seedlings into strong, healthy plants ready for transplanting or further growth. Attention to these details in the early stages is crucial for establishing a successful and productive garden.
Troubleshooting Common Issues
Growing plants from seeds is a rewarding venture, yet it comes with its set of challenges. Recognizing and addressing common issues early can significantly increase the chances of raising healthy, vigorous plants. This short section looks into some typical problems encountered during seed starting and early plant growth, offering practical solutions to ensure your gardening success.
Damping Off
- Identification: Damping off is a fungal disease that affects seedlings, causing them to rot at the soil line and collapse. It typically occurs in conditions of high moisture and poor air circulation.
- Prevention and Treatment: To prevent damping off, ensure seed starting mix is well-draining and avoid overwatering. Use sterile containers and soil to minimize the risk of fungal spores. Increasing air circulation around seedlings can also help prevent the disease. If damping off occurs, remove affected seedlings immediately to prevent the spread. Fungicides can be used, but prevention is the most effective strategy.
Leggy Seedlings (etiolation)
- Identification: Leggy seedlings have elongated stems and appear stretched out, usually due to insufficient light. They are weaker and may have difficulty standing up as they grow.
- Solution: Ensure seedlings receive enough light by placing them closer to the light source, utilizing lights with higher light intensity (PPFD) or using more lights. Turning seedlings regularly can also encourage more uniform growth. If using artificial lights, keep them on for 14-16 hours a day and positioned at a distance above the seedlings that delivers between 100 and 200 μmol/m2/s. Once seedlings get their true leaves they will require between 200 and 500 μmol/m2/s, and some that need to be indoors until they set fruit or start flowering will need 500-600 μmol/m2/s.
Keep in mind that hardening these plants off is required because the light intensity that direct sunlight provides is between 2,000 μmol/m2/s and 2,200 μmol/m2/s in most cases.
Pests & Diseases
- Common Pests: Seedlings can be susceptible to pests like aphids, spider mites, and fungus gnats. These pests can cause stunted growth, discoloured leaves, and in severe cases, death of the seedling.
- Organic Control Methods: Regular inspection of seedlings can help catch infestations early. Organic pest control options include neem oil, insecticidal soaps, and biological controls like introducing beneficial insects. Ensure proper watering practices and adequate spacing between plants to reduce the risk of diseases.
- Disease Management: Diseases in seedlings are often fungal or bacterial and can manifest as spots on leaves, rotting stems, or mold growth. Good hygiene, including using clean pots and tools, can prevent many diseases. Remove and dispose of infected seedlings to prevent the spread to healthy plants. Copper-based fungicides can be an effective organic treatment for some fungal and bacterial diseases.
Environmental Stresses
Seedlings can be sensitive to environmental stresses such as extreme temperatures, too much or too little water, and transplant shock. Gradually acclimatizing seedlings to outdoor conditions (hardening off; see next section) can help prevent transplant shock. Monitoring and maintaining consistent moisture levels, protecting seedlings from extreme temperatures by using cloches or row covers, and ensuring they are not exposed to direct, intense sunlight too soon are key measures to protect young plants.
By understanding and addressing these common issues, unlikely gardeners can enhance the success rate of seed starting and the subsequent growth of healthy plants. Vigilance, combined with preventive measures and timely interventions, can mitigate most problems, ensuring that the seedlings develop into robust, productive plants.
Transitioning to the Outdoors

Transplanting seedlings from their controlled indoor environment to the garden is a significant phase in their growth cycle. This transition, if done carefully, can greatly enhance plant health and productivity. The process involves acclimating seedlings to outdoor conditions, choosing the optimal time for transplanting, and employing techniques that minimize stress and root disturbance.
Hardening Off Process
Hardening off is the gradual introduction of indoor-grown seedlings to the outdoors. This process typically takes about 7-10 days and is crucial for preventing shock from sudden changes in temperature, light, and wind.
- Step-by-Step Guide: Begin by placing your seedlings outside in a shaded, protected area for 1-2 hours on the first day, avoiding direct sunlight and strong winds. Gradually increase their outdoor time daily, slowly exposing them to more sunlight. By the end of the hardening off period, seedlings should be able to withstand a full day of sunlight and the typical outdoor temperature range of your area.
Choosing the Right Time for Transplanting
Timing is key to successful transplanting. Consider both the weather conditions and the growth stage of your seedlings.
- Weather Conditions: Wait until the danger of frost has passed before transplanting tender seedlings outdoors. Use local frost date guides as a reference and monitor short-term weather forecasts to avoid unexpected cold snaps. Additionally, transplanting on overcast days or in the late afternoon can reduce the stress on seedlings by sparing them from the midday sun.
- Plant Growth Stages: Seedlings should be transplanted when they are strong enough to handle the transition. Look for the development of true leaves (usually the second set of leaves that appear) and ensure the plant has a robust root system but is not yet root-bound in its container.
Techniques for Successful Transplanting
- Preparing the Site: Before transplanting, prepare the garden bed by loosening the soil and adding any requited compost or fertilizer to give seedlings a nutrient boost. Water the area lightly.
- Minimizing Root Disturbance: When removing seedlings from their containers, handle them gently by the leaves instead of the stems. If using peat pots or similar biodegradable containers, you can plant them directly into the soil, ensuring the entire container is buried to prevent it from wicking moisture away from the roots.
- Planting: Dig a hole slightly larger than the seedling's root ball, place the seedling in the hole at the same depth it was growing in the container, and gently firm the soil around it. Water thoroughly immediately after planting to settle the soil and eliminate air pockets.
- Post-Transplant Care: Keep the soil consistently moist for the first few weeks after transplanting to support root establishment. Providing shade for the first few days can also help reduce stress and water loss.
The successful transition of seedlings to the outdoors sets the stage for their continued growth and eventual yield. By carefully hardening off plants, timing the transplant to favourable conditions, and employing gentle handling techniques, unlikely gardeners can ensure that their seedlings adjust smoothly to their new environment, paving the way for a productive gardening season.
Life is busy. Give Us Your Name & Email and We'll Send You Content.
